typescript로 popup만들기
웹서핑을 하다보면 다음과 같은 특징을 가진 요소가 등장한다.
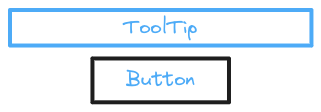 위 이미지와 같은 역할을 하는 기능을 만들것이다.
고민
내가 원하는 기능은 다음과 같다.
- 간단한 몇 줄의 코드로 팝업 요소를 구현할 수 있어야 한다.
- 옵션에 의해 팝업요소를 설정 할 수 있어야 한다.
- 옵션이 재설정 될 수 있어야 한다.
- 팝업요소가 화면에 벗어날 떄 보이는 위치로 재조정 돼야한다.
팝업 요소의 배치
다음은 팝업 요소를 배치하기 위해 생각한 방법들이다.
- 부모 요소 내부에 popup 요소를 배치하여 부모요소부터 상대좌표를 이용한다.
- 절대좌표를 이용하여 popup 요소를 배치한다.
상대좌표를 통한 배치
처음 구현할때는 부모요소 내부에 팝업요소를 배치하여 구현했다.
부모 요소 내부에 팝업 요소를 배치하는 방식은 구조상으로도 매우 깔끔해 보였고, 간단하게 구현 할 수 있기 때문이다.
다음 코드를 보아라
<div id="parent">
  <div id="popup"></div>
</div>

<script>
const parent = document.querySelector('#parent');
const popup = document.querySelector('#popup');
popup.style.left = parent.offsetWidht;
popup.style.top = 0;
</script>

<style>
.parent{
  position: relative;
  width:10px;
  height:10px;
}
.popup{
  position: absolute;
  widht:20px;
  height:50px;
}
</style>
위 코드에서 팝업요소의 배치위치는 부모요소의 우상단에 맞춰진 좌표다.
부모요소의 position을 relactive, 팝업요소를 absolute로 맞춰주는 번거로운 작업이 있지만 script 코드가 간단하니 괜찮은것 같다.
이제 다양한 좌표를 구현한 식과 옵션을 함수형식으로만 표현해준다면 원하는 기능이 완성된다.
하지만 나는 이 방법을 폐기했다.
왜 폐기했는가?
위 방법으로 시도하면 어떤 문제가 발생하는지 생각해봐야 한다.
1. 부모요소에 overflow:hidden 속성이 들어간 경우
우선 overflow:hidden 속성에 대해 알아야 한다.
overflow:hidden은 적용한 요소의 크기를 벗어난 자식 요소는 보이지 않게 된다.
위 코드는 overflow: hidden의 특징 때문에 팝업 요소가 보이지 않게 된다.
팝업 요소는 부내태그의 내부에 있고 좌표 이동을 통해 부모 요소를 완전히 벗어났기 때문에 완전히 보이지 않게 된다.
2. position: relactive 를 사용하지 못하는 경우 position:relactive의 특징에 대해 알아야 한다.
position: relactive의 특징은 이 포지션을 사용한 요로를 기점으로 내부 style의 특정 값들을 계산한다. 예를들어 width:20px 일때 내부 자식에서 width:100%를 하게 된다면 내부 자식의 width값은 20px이 된다.
position: absolute의 특징은 body 또는, relactive에 의해 상대적으로 배치된다. 예를들어 top:0, left:0이라면, relactive된 부모 요소의 (0,0) 좌표 즉 좌상단에 배치된다.
즉 이런 특징을 이용한 ui일 경우엔 popup요소의 배치위치에 대한 신뢰성이 무너지게 된다. 원치 않은 좌표에 팝업 요소가 배치될 가능성이 높기 때문이다.
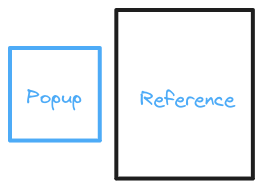
절대좌표를 통한 배치
절대좌표로 팝업을 배치한다면 태그의 시작점인 body 태그에 배치해야한다.
절대좌표를 이용하여 팝업을 배치하면 상대좌표를 이용한 배치의 문제점을 해결 할 수 있다.
- overflow:hidden? 최상위 태그의 바로 아래에 배치할 것이니 z-index 또는, 화면을 벗어나는 경우만 생각하면 된다.
- position: relactive? 해당 포지션 정책을 찾지 못하면 최상위 태그인 body태그를 기점으로 특정 style 값들이 계산되니 신경쓸 필요가 없다.
절대좌표 계산
팝업요소의 배치위치를 구분해줘야 한다.
각 배치위치에 대한 좌표는 하나하나씩 직접 구현해줘야 한다. 우선 나는 총 12군데의 배치 위치를 구분했다.
type Placement =
  | "top" //top center
  | "top-right"
  | "top-left"
  | "right" //right center
  | "right-top"
  | "right-bottom"
  | "bottom" //bottom center
  | "bottom-right"
  | "bottom-left"
  | "left" //left center
  | "left-top"
  | "left-bottom";
여기서 다시한번 원하는 기능을 하기위해 좌표계산을 어떻게 구현할지 설계를 해야 한다.
- placement가 추가 될 수 있다.
- 옵션에 의해 설정, 재설정 될 수 있다.
전략 패턴을 사용한다면 위와같은 조건을 해결 할 수 있다.
작성한 코드가 매우 긴 관게로 간략히 핵심 코드만 보여주겠다.
추상화한 전략 클래스 이다.
abstract class PlacementStrategy {
  protected referenceRect: DOMRect;
  protected popupRect: DOMRect;
  protected options: Options;
  constructor(referenceRect: DOMRect, popupRect: DOMRect, options: Options) {
    this.referenceRect = referenceRect;
    this.popupRect = popupRect;
    this.options = options;
  }
  abstract getCoordinate(): Coordinate;
}
DOMRect : element.getBoundingClientRect() 의 반환되는 값의 타입이다.viewport를 기점으로 계산된 좌표값과 요소의 크저에 대한 정보가 들어있는 객체다.
다음은 전략을 구현한 left의 클래스 이다.
class PlacementLeft extends PlacementStrategy {
  getCoordinate(): Coordinate {
    return {
      top:
        this.referenceRect.height / 2 +
        (this.referenceRect.top + scrollY) -
        this.popupRect.height / 2,
      left:
        this.referenceRect.left +
        scrollX -
        this.popupRect.width -
        this.options.gap,
    };
  }
}
Options 에 대한 설명은 이후 뒤에 서술하겠다.
위 계산을 통해 팝업 요소는 참조 요소의 왼쪽 가운데에 배치된다.
위와 같은 방식으로 총 12군데의 배치 좌표를 구현했다.
팝업 요소를 생성할때 어떤 전략을 사용할지 알 수 없기 때문에 팩토리 함수를 구현해줘야 한다.
const usePlacement = (
  placement: Placement,
  referenceRect: DOMRect,
  popupRect: DOMRect,
  options: Options
): PlacementStrategy => {
  switch (placement) {
    case "bottom":
      return new PlacementBottom(referenceRect, popupRect, options);
    case "bottom-left":
      return new PlacementBottomLeft(referenceRect, popupRect, options);
    case "bottom-right":
      return new PlacementBottomRight(referenceRect, popupRect, options);
    case "left":
      return new PlacementLeft(referenceRect, popupRect, options);
    case "left-bottom":
      return new PlacementLeftBottom(referenceRect, popupRect, options);
    case "left-top":
      return new PlacementLeftTop(referenceRect, popupRect, options);
    case "right":
      return new PlacementRight(referenceRect, popupRect, options);
    case "right-bottom":
      return new PlacementRightBottom(referenceRect, popupRect, options);
    case "right-top":
      return new PlacementRightTop(referenceRect, popupRect, options);
    case "top":
      return new PlacementTop(referenceRect, popupRect, options);
    case "top-left":
      return new PlacementTopLeft(referenceRect, popupRect, options);
    case "top-right":
      return new PlacementTopRight(referenceRect, popupRect, options);
    default:
      throw new Error(`Unsupported placement: ${placement}`);
  }
};
지금부터 이 함수를 사용하면 원하는 전략을 선택하여 사용할 수 있을 것이다.
옵션
팝업의 설정을 다루는 옵션을 만들어야 한다.
옵션의 인터페이스를 만들어 보자.
interface Options {
  placement?: Placement;
  gap?: number;
}
Placement는 위에서 설명한 12군데의 위치를 말한다.
gap은 참조요소와 팝업요소의 사이값을 정한다.
popup-core
화면 벗어남을 처리하기 전에 원하는 대로 동작하는지 확인해 봐야 한다.
먼저 옵션 설정 및 핵심적인 로직을 처리하는 클래스를 만들어 보자
class Popup(){
  private options: Options;
  private referenceElement: HTMLElement;
  private popupElement: HTMLElement;
  private placementStrategy: PlacementStrategy;
  constructor(
    referenceElement: HTMLElement,
    popupElement: HTMLElement,
    options?: Options
  ) {
    this.options = { ...defaultOptions, ...options }; //defaultOptions에 options의 값을 덮어쓰기 한다.
    this.referenceElement = referenceElement;
    this.popupElement = popupElement;
    this.update();
    //요소를 2번째 인자 뒤로 옮기는 함수다. 여기선 팝업 요소를 body태그 내부에서 마지막(null) 으로 옮기는 역할을 한다.
    document.body.insertBefore(this.popupElement, null);
  }
  // 팝업 요소의 초기화와 설정으로 변경될 수 있는 값들을 처리하는 로직이다.
  private update(): void {
    // 사용할 placement를 설정한다.
    this.placementStrategy = usePlacement(
      this.options.placement,
      this.referenceElement.getBoundingClientRect(),
      this.popupElement.getBoundingClientRect(),
      this.options
    );
    //  팝업요소를 배치한다.
    this.place(this.placementStrategy.getCoodinate());
  }
  //옵션 수정 함수
  public setOptions(options: Options) {
    this.options = { ...this.options, ...options }; // 옵션 덮어쓰기
    this.update();
  }
  // 팝옵요소를 배치하는 함수
  private place(coord: Coordinate): void {
    this.popupElement.style.position = "absolute";
    this.popupElement.style.top = `${coord.top}px`;
    this.popupElement.style.left = `${coord.left}px`;
  }
}
주석을 달아놨으니 참고하길 바란다.
createPopup
핵심 클래스를 만들었으니 핵심 클래스를 사용하는 함수를 만들어 준다.
function createPopup(
  reference: HTMLElement,
  popup: HTMLElement,
  options?: Options
): Popup {
  return new Popup(reference, popup, options);
}
실제 사용시 코드를 보아라.
<div id="reference">
  <div id="popup"/>
</div>

<style>
.reference{
  width:150px;
  height:150px;
  background-color:#19a1a8;
}
.popup{
  width: 50px;
  height: 50px;
  background-color:#2375ff;
}
</style>

<script>
const reference = document.querySelector('#refernce')
const popup = document.querySelector('#popup')

const myPopup = createPopup(reference, popup, {
  placement: 'bottom',
  gap: 12
})
myPopup.setOptions({
  placement: 'right-top',
  gap:0
})
</script>
결과를 확인해 본다면 최종적으로 참조요소와 달라붙은 팝업 요소가 보일 것이다.
최종 결과물을 js로 빌드했으니 직접 사용해 보아라.
See the Pen Untitled by 이재혁 (@oophxzfe-the-solid) on CodePen.
하지만 화면을 벗어나면 팝업 요소가 안보이는것을 확인 할 수 있다.
이제 처음으로 돌아가 원했던 기능중 몇가지를 완료했는지 체크해보자.
- 간단한 몇 줄의 코드로 팝업 요소를 구현할 수 있어야 한다.
- 옵션에 의해 팝업요소를 설정 할 수 있어야 한다.
- 옵션이 재설정 될 수 있어야 한다.
- [] 팝업요소가 화면에 벗어날 떄 보이는 위치로 재조정 돼야한다.
화면 벗어남
팝업요소가 화면을 벗어나는 경우를 판단하는 방법은 viewport의 범위를 팝업요소가 넘어갔는지 확인해야 한다.
다음은 팝업 전략 클래스이다.
abstract class PlacementStrategy {
  protected referenceRect: DOMRect;
  protected popupRect: DOMRect;
  protected options: Options;
  protected coord: Coordinate; // new!!
  constructor(referenceRect: DOMRect, popupRect: DOMRect, options: Options) {
    this.referenceRect = referenceRect;
    this.popupRect = popupRect;
    this.options = options;
    this.coord = this.getCoordinate(); // new!!
  }
  // new!!
  //overflow : true , not overflow : false
  public checkOverflow(): boolean {
    return !(
      this.coord.top >= scrollY &&
      this.coord.left >= scrollX &&
      this.coord.top + this.popupRect.height <= scrollY + innerHeight &&
      this.coord.left + this.popupRect.width <= scrollX + innerWidth
    );
  }
  abstract getCoordinate(): Coordinate;
}
주석으로 추가된 부분을 표시해 놨다.
생성자를 보면 팝업 요소의 좌표를 저장한다는걸 알 수 있을것이다.
checkOverFlow()를 보면 팝업 요소의 상하좌우의 좌표가 viewport의 크기를 넘어가는지 확인하는 로직임을 알 수 있다.
화면을 벗어나는 경우
화면을 벗어나는 경우는 2가지의 경우에서 발생한다.
- 브라우저 창의 크기를 변경할 때
- 스크롤 했을 때
관련 이벤트로 resize와, scroll 이벤트가 있다.
옵션 수정
이벤트를 옵션으로 관리할 것이다.
- 매우 많은 이벤트 함수가 발생 할 수 있다.
- 해당 기능이 필요없을 수 도 있다.
interface Options {
  placement?: Placement;
  gap?: number;
  mode?: Mode;
  event?: Event;
}
interface Event {
  resize?: boolean;
  scroll?: boolean;
}
interface Mode {
  auto?: boolean;
}
특정 이벤트가 발생하면 mode에 활성화된 함수를 실행할 계획이다.
throttling
scroll 이벤트와 resize이벤트의 공통점은 매우 많은 이벤트가 감지된다는 것이다.
팝업 요소의 화면 넘어감을 방지하는 이벤트는 촘촘할 필요가 없으며, 필요없는 연산이 매우 많이 발생하기 때문에 성능저하의 가능성도 있다.
스로틀링(Throttling): 함수의 호출을 제한하여 일정한 주기나 시간 간격으로만 호출되도록 한다. 주로 이벤트 핸들러나 반복적으로 호출되는 함수에 적용되어 연속적인 호출로 인한 성능 문제를 방지하거나 원하는 주기로 함수를 실행할 때 사용된다.
스로틀링 개념을 도입하여 최적화를 해야한다.
function throttle(callback:()=>any, delay:number){
    let wait = false;
    return () => {
        if(wait) return;
        callback();
        wait = true
        setTimeout(()=>{
            wait = false
        }, delay)
    }
}
popup-core 수정
화면 넘어감을 방지하기 위한 핵심코드를 작성해보자.
class Popup {
  //event에 .bind를 하면 새 참조가 만들어짐 이를 받기위한 변수
  private bindModeFunction: any;
  constructor(
    referenceElement: HTMLElement,
    popupElement: HTMLElement,
    options?: Options
  ) {
    this.bindModeFunction = throttle(this.modeManage.bind(this), 100);
  }
  // 팝업요소 업데이트 함수
  private update(): void {
    this.eventManage();
    this.modeManage();
  }
  /* modes */
  private modeManage(): void {
    this.auto();
  }
  private auto(): void {
    if (this.options.mode?.auto) {
      // 적힌 순서에 따라 연산한다.
      const placementArray: Placement[] = [
        "top",
        "top-right",
        "top-left",
        "right",
        "right-top",
        "right-bottom",
        "bottom",
        "bottom-right",
        "bottom-left",
        "left",
        "left-top",
        "left-bottom"
      ];
      // 옵션에 설정된 placement가 화면 범위를 벗어났을때 실행한다.
      if (this.placementStrategy.checkOverflow()) {
        //순차적으로 연산하여 가장먼저 false가 나온 placement를 배치시키다.
        for (const placement of placementArray) {
          // if (this.placementStrategy.getPlacementName() === placement) continue;
          const place = usePlacement(
            placement,
            this.referenceElement.getBoundingClientRect(),
            this.popupElement.getBoundingClientRect(),
            this.options
          );
          if (!place.checkOverflow()) {
            this.place(place.getCoordinate());
            break;
          }
        }
      }
      else {
        this.place(this.defaultCoordinate);
      }
    }
  }
  //이트트를 등록하고 지우는 함수이다. 옵션에 의해 등록, 삭제될 수 있다.
  private eventManage(): void {
    if (this.options.event?.resize)
      window.addEventListener("resize", this.bindModeFunction);
    else window.removeEventListener("resize", this.bindModeFunction);
    if (this.options.event?.scroll)
      window.addEventListener("scroll", this.bindModeFunction);
    else window.removeEventListener("scroll", this.bindModeFunction);
  }
}
추가된 부분만 작성하였다. 설명은 주석을 참고하길 바란다.
원했던 모든 기능을 구현했으니 글을 마치겠다.